Sketchup Blog - News and Notes from the Sketchup folks

My new favorite thing: Fur Maker

Having spent the last three hours fiddling with Ruby developer tak2hata’s amazing new SketchUp plugin, I can proclaim one thing with absolute confidence:

Everything is better with fur on it.

I submit for your consideration the following well-known corporate logo (modeled in SketchUp):

Not bad.

Now with fur added:

Awesome. Awesomer. Awesomest.

I rest my case.

Tak2hata released Fur Maker into the world less than a month ago, but it’s already made quite a splash with the SketchUp faithful; people are having tons of fun with it. Quite simply, it allows you to “grow” fur (or fur-like things like grass) on your model faces. You make a selection, activate Fur Maker, adjust the settings, and click Make Fur. After a few seconds, your model looks like it just drank a testosterone milkshake. But in a good way.

First, the requisite disclaimers and instructional bullets:

  • Fur Maker is available for download for free from this thread on SketchUcation. If you think it’s as terrific as I do, leave tak2hata a note (on the thread) to thank him.
  • To install it, download the fur_en.rb and fur_lang_en.txt files from the above link and drop them in your plugins folder. If you’d prefer another language, download the relevant .txt file instead (as of today, kind volunteers have provided translations for Japanese, Spanish, French and Persian). Take a look at our Ruby Scripts page for more info if you need it.
  • Fur Maker is a young script, meaning it’s only been around for a very short time. As such, there’s always a chance it’ll exhibit erratic behavior. Save early and often.
  • I am by no means a Fur Maker expert. I know what some of its controls do, but others baffle me. I’ve just been experimenting to see what I get; the script is quick enough for plenty of trial-and-error.

How it works

After it’s installed, choose Plugins > fur_en > fur_en(WebDialog) from SketchUp’s menu bar to bring up the Fur Maker control panel. Like I said, I don’t know exactly what everything does, but here’s some of what I’ve figured out so far:

Type lets you pick a ready-made shape to use as a single, repeated element. “Linear” seems to work well for hair and grass. “Arch” and “Leaf” are appropriate for other kinds of vegetation. “Rectangular” and “Box” might be useful if you’re modeling trees for the ice planet Xderaflunon.

Density(Num/m2) and Max Number(/Face) control the number of entities the script creates.

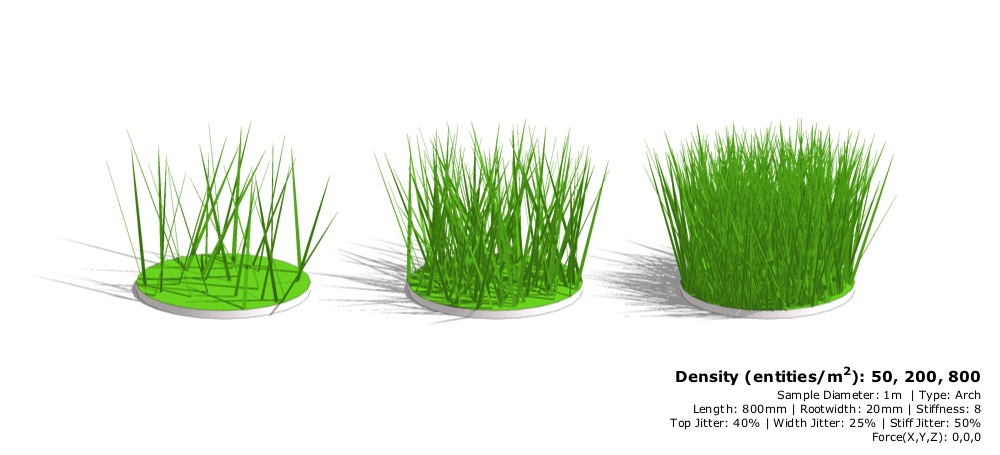
You can adjust the density of your fur.

Length and Rootwidth control the size of the entities that are drawn. To be clear, Rootwidth lets you specify the width at the widest part. Use a small number (relative to Length) for grass; pick a bigger number for broader leaves.

Length is a pretty straightforward variable.

Stiffness seems to be exactly what it implies; entities’ resistance to bending when a Force (later on in the dialog box) is applied. I’m not sure what the units of measure are, but a Stiffness of 1 is very droopy, and 100 is quite a bit less so. The default value of 8 seems to yield good results most of the time.

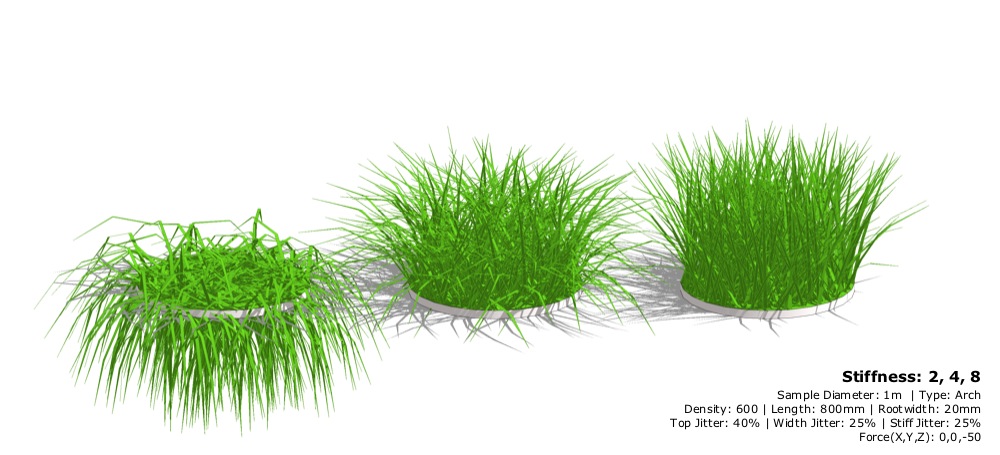
Control the droopiness of your entities by adjusting Stiffness and applying a Force. Did I just write that?

Top Jitter, Width Jitter and Stiff Jitter are controls that let you randomize the size, orientation and stiffness of entities. Setting them to 0% makes everything identical. Setting them to 100% makes it look like your model just got out of bed.

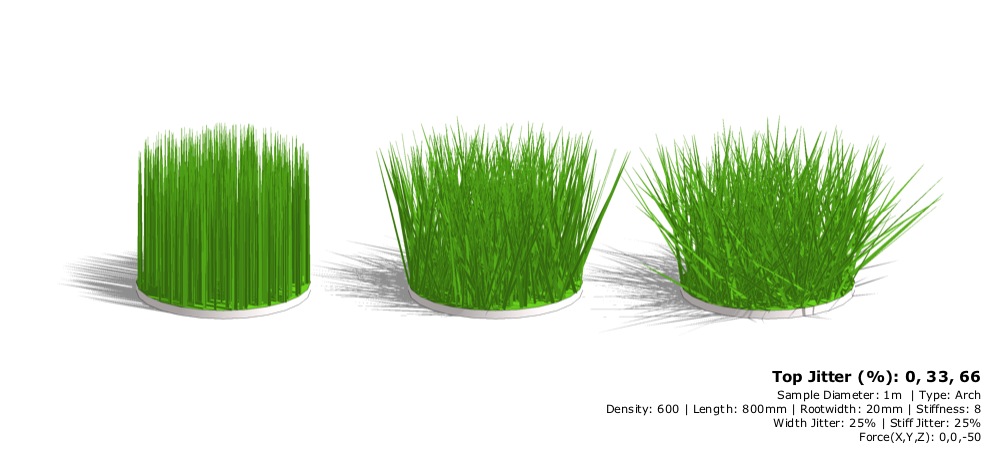
Top Jitter randomizes the size and orientation of your entities.

I currently have no idea what the settings for Divide and Valid Distance do. Could someone please enlighten me via this post’s comment thread?

Direction (X, Y and Z) appear to influence the general orientation of entities in your ensuing “fur”. I’m not crystal clear about this, but setting a very high number (like 3000m) for any one of these fields seems to have a profound effect.

Force (X, Y and Z) let you simulate the effect of things like gravity and wind. Too cool, really. Used in combination with Stiffness (see above), you can get some really nice effects.

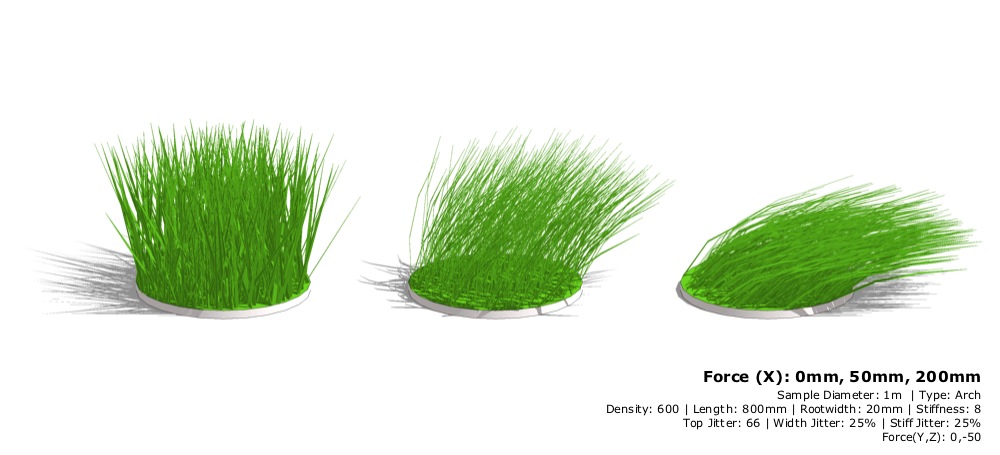
Force lets you bend your entities in a given direction. Make sure to use in conjunction with Stiffness.

Component lets you specify what to use as an individual entity. Choosing “no” draws whatever you’ve selected in Type (above) as simple, ungrouped geometry. Choose “yes” draws components; this takes longer. You can also pick any component in your model to use as an entity.

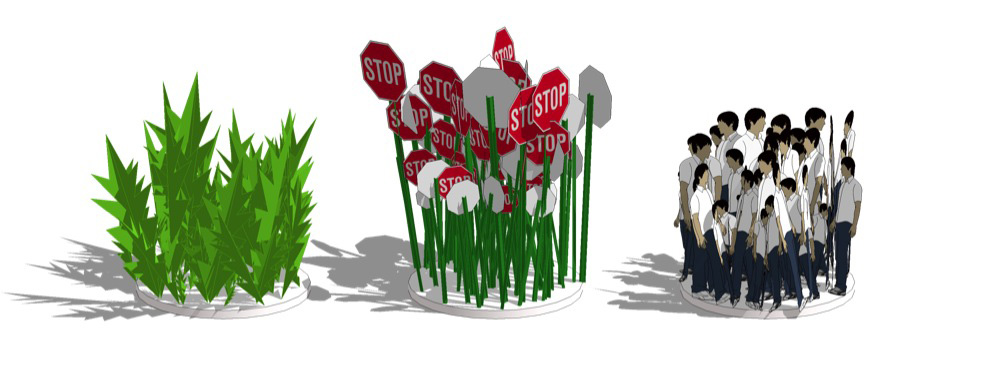
You can use any component you like.

I haven’t played with the settings for presets just yet. I’m having too much fun putting fur on everything I’ve modeled in the last three years.

Thank you and congratulations to tak2hata -- you’ve made a lot of SketchUppers very, very happy this month.

Posted by Aidan Chopra, SketchUp Evangelist

Permalink | Links to this post | 18 comments

Author badges in the 3D Warehouse

We’re excited to introduce author badges in the Google 3D Warehouse. Badges are our way of recognizing your modeling accomplishments and helping to establish your reputation in the 3D Warehouse community.

There are badges for:

  • uploading a SketchUp model
  • creating a Building Maker model
  • recognizing the number of buildings you’ve had accepted into the 3D Buildings layer of Google Earth
Here are my badges as displayed in My Models page:

As you can see, I’ve been busy working on badges and not models, so perhaps you’d like to see badges for more prolific geo-modelers? Check out a couple of our featured modelers: Tobias Merk and ftang. A complete explanation of the badges can be found in this help center article.

Ready to see what badges you already have? Sign into the 3D Warehouse and take a look. Your badges will be visible right on the front page. You can also click on My Warehouse > My Models to see your badges. Want to see what badges other users have? Simply click on their user name to get to their profile page. Competition among modelers just became a lot more fun. Stay tuned for more badges!

Permalink | Links to this post | 10 comments

Use your own photos in Building Maker

Previously, Google Building Maker restricted you to using only our aerial images for your models. Today, we are happy to announce a new feature that allows you to upload your own photos for building creation - resulting in higher-detailed and more realistic building facades! The following images demonstrate how this new feature improves your building's appearance:

Watch this video to learn how to use this feature:


A new "Add your own photos" link will appear below the left image list after you have constrained three points of a block in at least two aerial images. Click on that link to upload your photos to a Picasa album, choose the photos for modeling, and specify the direction you were aiming when you took the photos. The new photos will appear in the image list.

Select one of these photos and adjust the block to fit. You must first adjust the block to fit (having added 7 points) before the Building Maker tools will be enabled. For further information refer to our user guide article.

There are also some example photos here for your experimentation. We hope you will have fun with this new addition!

Permalink | Links to this post | 15 comments

Benvenuti a Venezia

Venice, Italy in 3D is now live on Google Earth. You can take a virtual stroll starting at the train station (Venezia Santa Lucia) and traverse Ponte Scalzi to get to Campo Santa Margherita. You can check out the recently completed "fourth bridge" (Ponte della Costituzione) on the Grand Canal, without ever having to be in Venice. Or, you could watch the city from the vantage point of a bird perched atop St Mark's Campanile (Campanile di San Marco), walk around Palazzo Grassi or explore the Rialto Bridge (Ponte di Rialto).

All of these places and more can be yours to discover through Google Earth and Earth view in Google Maps. Watch the video below to fly through the city to experience the Venetian landmarks.


Whether you've never been to Venice, are a native curious to explore your city from a unique perspective or anything in between Venice in 3D offers an incredible opportunity to visit and explore "La Serenissima" in exciting new ways.


As a Google employee and a native of Italy I treasure the opportunity to virtually rekindle my memory of particular locations in Italy as well as plan trips and itineraries for my next visit home. Buon Viaggio!


Permalink | Links to this post | 3 comments

Experience the 9/11 Memorial in Google Earth

(Cross-posted from the Google Lat Long blog)

The 9/11 Memorial organization, a non-profit group responsible for care-taking the 9/11 museum and memorial park, first contacted Google in 2008 to explore ideas on how our technology might be used to enhance the experience for people visiting the museum (currently under construction) and on its website. Several ideas were proposed, including the use of Street View, which the group added to their Make History website in 2009.

We met at Google’s New York City office and learned about the many creative exhibit ideas that were planned for the museum, as well as the design concepts behind the 9/11 memorial park. I found it very fascinating. I couldn’t help but wonder: how can this be shared with the world? How can we enable everyone, anywhere to learn more about events of that day, and experience what proposes to be an unforgettable museum and park?

The 9/11 Memorial designers presented artist renderings and physical models of the proposed construction, both of which were impressive, but the audience for each is limited to the small population of the public who can see them in-person. The meeting could have concluded with a list of proposals for the 9/11 organization to pursue, however we left feeling as though Google could and should do more. The events of that day are etched in all of our memories, and we felt obligated to identify an appropriate way to honor the families of the victims and support the organization whose charter it was to preserve our collective memories.

Our proposal of course was Google Earth. The products’ popularity and reach would make it an ideal platform for people to visit and explore the 9/11 site - virtually. Virtual tourism is one of the most common uses of the Google Earth, and, it’s been used to represent both historical and future buildings in the past, so we thought it would be fitting to create a 3D model of the 9/11 memorial so that people anywhere could envision what the memorial will look like when it’s completed next year.


We requested design drawings, artist renderings, and any other visual materials that could be used to construct a 3D model, and went to work. Mason Thrall, one of our most experienced 3D modelers was the first to volunteer to develop a model of the park. The 9/11 Memorial group incorporated the Google Earth plugin into their website, and developed KML placemarks that help orient visitors to the site. Take a 3D tour of the 9/11 Memorial and Museum within the context of the surrounding landscape of lower Manhattan.

The 9/11 memorial is scheduled to open next year, however you can experience today via Google Earth on their website.

Permalink | Links to this post | 1 comments

Stockholm is on the 3D Map

Stockholm, which is said to be referred to as the “Venice of the North” may not receive a lot of sunlight throughout the year, but today it’s in the limelight as the newest city to be included in the 3D Buildings layer of Google Earth. Watch the video below to see Stockholm, Sweden in 3D:


Stockholm is a unique geographic location - filled with historic bridges, buildings, and parks. The rich architectural history make it a fulfilling destination for the virtual tourist.


The city's oldest section is "Gamla Stan"(The Old City). It's located on the original small islands of the city's earliest settlements and features cobbled streets and medieval alleyways.


And if time is short, make sure you fly over to The Royal Palace, the official residence of His Majesty The King. Explore Stockholm in 3D with Google Earth and now with Earth view in Google Maps.


Permalink | Links to this post | 2 comments

A new home in Jacksonville

We offer a Non-profits Program for public benefit, 501 (c)(3) organizations to apply for a SketchUp Pro grant. One of our grantees, Habitat for Humanity of Jacksonville, Inc., sent us this story about using SketchUp Pro for a house plan:

The Habitat for Humanity affiliate in Jacksonville, FL (HabiJax) is about to complete a 14 house subdivision named Paris Village. In preparation for this special project, HabiJax decided to create a new house design, the “Jackson”, and add it to the collection of plans available for selection by our home buyers.

My challenge was to provide a way for our home buyers to envision the “Jackson” without ever seeing it in person. SketchUp was the perfect solution -- it’s fast and easy to learn. As a nonprofit, the affiliate always strives to maximize resources, without sacrificing the quality of our products. SketchUp helped us do just that.


Rendering we used to advertise the new subdivision (SketchUp model rendered in Photoshop)


Choosing a house plan is always an exciting step for our clients in their path to home ownership, and generally our home buyers have to rely on seeing other houses built while they complete their 300 volunteer hours. Many of the Paris Village home buyers ended up selecting the “Jackson” model -- it has quickly become a favorite! We’ve all been very excited to watch the plan come to life as the home buyers, volunteers, and donors worked together on site.


User story, models and photos provided by Jack Spellman, Construction Coordinator, HabiJax


Permalink | Links to this post | 3 comments

Spring into a SketchUp training class

Our worldwide network of SketchUp Authorized Training Centers makes learning SketchUp quicker than ever. Our certified SketchUp trainers provide hands-on training that will have you designing, sharing and presenting 3D models in no time. We’ve put the June training schedule on a map below (click on a red pin to learn about the training center and sign up):


View June 2010 Training Schedule in a larger map

Do you need more SketchUp experts in your office? Our Authorized Training Centers also offer custom training classes that can be designed specifically around your workflow. Visit our Training Page to contact a training center in your area.

Permalink | Links to this post | 2 comments

Announcing the Google Model Your Town Competition winner

On April 1st, we announced the five finalist towns for the Google Model Your Town Competition and asked the public to help pick the winning town. For the past month, participants reviewed the 3D models, explored the buildings in Google Earth and watched videos of the 3D towns.

Well, we’ve tallied the votes and we’d like to congratulate our 2010 winning town: Barranco - Lima, Peru!

Jorge De Albertis Bettocchi, a 38 year-old corporate business attorney, modeled the Barranco District of Lima. He entered the competition to generate pride among his fellow citizens and created his 3D models to serve as a tool for tourism, promotion, investment and preservation of Barranco’s historic architecture. Jorge also created a blog, Barranco 3D Project, that includes descriptions of his models, his modeling process, community involvement and press videos.


Jorge is also a musician who plays the keyboard, has a small recording studio, and has participated in the production of concerts in Peru. “I started creating SketchUp models in 2007 when I was asked to design a stage for a rock concert, and a concert-production partner recommended using SketchUp. Since then I have not stopped using it and it is the only 3D design program I have ever used.”

Jorge, you have impressed people all over the world with your SketchUp models. Congratulations to the Barranco community!

We’ll be awarding the local school district with US$10,000 and the SketchUp team is planning a visit to Barranco later this summer to recognize their efforts. Visit the Google Earth Gallery to download a 3D tour of Barranco, Peru and visit our winners page for more details.

Thanks to all those who voted to help us find the winning town. And thanks to all the modelers out there who submitted entries — we hope you'll continue to add 3D buildings to Google Earth!

Permalink | Links to this post | 21 comments

Earth view in Google Maps widens audience for 3D buildings

Last month’s release of Earth view in Google Maps has folks in the Google Boulder office especially excited. For the past four years we’ve been working hard to develop 3D modeling tools and a 3D building approval system to help enhance the experience inside Google Earth. Now anyone with a web browser and the Google Earth Plugin can enjoy the 3D Earth experience directly in Google Maps. A rich, interactive 3D view is a great complement to the 2D map view.


The new Earth View is also big news for creators of 3D buildings as it expands the audience for models. Not only are they visible in Google Earth, but they’re also viewed by all Google Maps users. And now that it’s even easier to access them, high-quality 3D models are more valuable.

If you have models that are in the “3D Buildings” layer in Google Earth, it’s now easier than ever to share your building with others. From Earth view, click on “Link” in the upper right corner to grab a URL for sharing.

Permalink | Links to this post | 3 comments

SketchUp goes down under...

A few weeks ago, members of the SketchUp team traveled to Sydney, Australia. We met with customers, attended the Form & Function Conference and presented a SketchUp Pro Demo to local architects at our Google Sydney office. In the next few weeks, I’ll post some of the work they’ve created in SketchUp & LayOut and include a few words on how they’re using 3D design & modeling in their offices.

For Part I of this SketchUp Pro “Down Under” series, the folks at Collard Maxwell Architects shared their story with us:

SketchUp Pro “Down Under” Part I: Collard Maxwell Architects

Collard Maxwell Architects is a Sydney-based architecture firm with a philosophy that successful architecture is the synthesis of art, technology and building economics resulting in memorable, economic and sustainable building solutions.

Alberto Sunderland, a Project Leader for CM+A, says that initially SketchUp Pro was used as a quick visualization tool of early concept work.

“The models were never very detailed and it was a tool used primarily within the office. It was used as a quick way of understanding massing and scale to determine if the design was heading the right direction."

SketchUp is used to confirm a complex set of egress stairs from a substation.

“As our skill grew we began to use SketchUp to generate models we could show our clients to help them understand the projects and to provide a quick and effective way of trying out changes before updating all our cad documentation."

Hornsby Project - Model was especially useful as the client was asked by council to explore a number of options for the façade treatment. Council signed off the changes based primarily on the images generated from the SketchUp model.

Balcony Detail - Model used to help the owners of the building understand very clearly what their balcony extensions will look like and show the builder detailed information.

“Over a period of time we began to use SketchUp Pro for tender presentations. Although we originally took the images and “dumped them” into Photoshop to create the presentation posters, we eventually discovered the possibilities of the SketchUp Pro’s LayOut tool. Combining LayOut with our SketchUp work has made the creation of simple, effective and clear presentations much quicker than our previous method utilizing Photoshop. We are very impressed.”


“We anticipate that SketchUp will become the primary visualisation tool in this office and, together with LayOut, it will be used to create most, if not all our presentation slides. The speed and ease of use of the software is amazing, and we are coming to appreciate the importance it may have within our workflow.”

Thank you Alberto and the entire CM+A staff for providing the project graphics and their story. SketchUp Pro “Down Under” to be continued...

Permalink | Links to this post | 9 comments

Save the Date: Google Geo Teachers Institute, July 21-22

For years, Google's Geo products have been identified as a powerful learning toolkit that can help students conceptualize, visualize, share, and communicate information about the world around them.

This July, Google is hosting the first Google Geo Teachers Institute. This event is a free professional development experience designed to help educators get the most from Google's Geo products and technologies. The Geo Teachers Institute is an intensive, two-day event where participants get hands-on experience with Google's Geo products: Google Earth, Google Maps, and Google SketchUp, including a focus on features like Mars, Moon and Sky in Google Earth.

Attendees will learn about innovative instructional strategies and receive resources to share with colleagues. The Google Geo Education team hopes this event will empower educators to bring the world's geographic information to students in a compelling, fresh, and fun way.

To apply, send an email to geoedu@google.com.

Permalink | Links to this post | 1 comments

Take part in the SketchUp to Piranesi Competition

Our friends over at SketchUcation are hosting a nifty challenge: The SketchUp to Piranesi Competition is meant to celebrate the features of the SketchUp to Piranesi Plugin, as well as the “Design to Art” abilities of Piranesi 2010.

Piranesi is a whiz-bang app that lets you turn your model views into beautiful NPR (non-photorealistic) renderings. My favorite part about it is that it’s far from an automated process; using Piranesi is more like painting and drawing with natural media than using clunky software. You need to try it to see what I mean.

You can download a fully-functional demo version of Piranesi in order to participate in this competition. Use either SketchUp Pro or the free version of SketchUp to participate. This workflow page should help you get started.

Check out the official competition announcement on the Daily CatchUp (SketchUcation’s blog) for more information about prizes, rules and more. John Bacus (the SketchUp Product Manager) and I are two of the judges -- we can’t wait to see what you create.

Sir Elder / Larice's Living

Susan Sorger / Entourage Arts

David A. Walker / Modern Infill

Permalink | Links to this post | 0 comments

Explore more 3D models in Lisbon

The city of Lisbon, Portugal is the latest addition to the 3D Buildings layer in Google Earth. Over 14,000 models have been added to fill in around areas where many user-contributed models already existed.

Sé de Lisboa

Since Google Building Maker added Lisbon to the available cities to model, geo-modelers have been adding incredible 3D buildings throughout the area.


However, let’s not forget some of the amazing SketchUp models that have been in the 3D Buildings layer even earlier:

Mae d'agua modeled by rafa


We encourage you to explore the rest of Lisbon in Google Earth, or with the new Earth view in Google Maps!

Permalink | Links to this post | 3 comments

SketchUp in a high school history class

Pick a high school - any high school - and in the history class you might find some of the students doodling, yawning and pretending to stay awake. Replace that scene with an enthusiastic teacher and a healthy dose of SketchUp and you might see every student engaged! After all, it’s not every day a high school student can model a local building and upload to Google Earth for the world to see. In some cases, they might get so engaged they chomp at the bit to get access to tutorial videos while on road trips.

Does this sound far fetched? Not to Hartford High School teacher, Michael Hathorn, who introduced his class to the 3D Buildings layer in Google Earth and started teaching them about local history while they used SketchUp to model their home town of Hartford, Vermont. The class caught on quickly and now have over 75 models in their Hartford History Project collection in the Google 3D Warehouse. Over 50 buildings have been accepted into Google Earth.


The benefits of students being engaged in their own learning has not been lost on Michael. He told us, “Some teachers may say the book history is more important but I feel like the end result is these guys are teaching, verses learning and that’s when you really become a student - when you make that transition to teaching. I think learning SketchUp is really important for a history class like this.”

Technology has been a key part of the class, and the idea that the students would share their local history with the world. They created a website and blog to accompany and showcase the 3D models. With each model created, a history of the building is researched and added to the growing website dedicated to their town. It’s definitely worth a look.

We were so intrigued by the efforts of these students that we highlighted them in a new video:


Permalink | Links to this post | 5 comments

Five continents and counting - new cities in Building Maker

You might have noticed that the Building Maker team has been quiet on the city front in the last month. Well, we’ve been working behind the scenes to make our next set of cities available for modeling. With 11 new cities, Google Building Maker has extended its coverage to include nine new cities in South Africa and two new regions (plus added coverage of two existing regions) in California.


Whether you want to explore the Victoria & Alfred Waterfront in Cape Town, model the cities where the Springboks play or explore the venues of another sporting code, now is your chance. Go to Google Building Maker and choose one of these cities from the top-right drop-down menu or click on a red pin to zoom down. The new cities in Building Maker are:

South Africa

  • Bloemfontein
  • Cape Town
  • Durban
  • Johannesburg
  • Nelspruit
  • Phokeng
  • Polokwane
  • Port Elizabeth
  • Pretoria


California
  • Oakland
  • Berkeley
  • San Francisco (extended coverage)
  • Redwood city (extended coverage)
Happy modeling!

Permalink | Links to this post | 0 comments

Building positions are now automatically updating

We have some good news to share with respect to 3D buildings and Google Earth imagery.

A common challenge for geo-modelers are imagery updates that occur after a building model has been published to Google Earth. In some updates models were unaffected, but in others, models became misaligned (some significantly).


We appreciate the fact that our enthusiastic geo-modeling community prefers to spend their time creating buildings instead of chasing imagery around. Our engineers have been hard at work solving this problem.

Very shortly we'll be running a program that identifies models that have been affected by imagery shifts, and automatically adjust them. The earth is an imperfect place so it’s possible, that not every building will adjust perfectly. However, our testing suggests that this new system of tracking imagery updates should help immensely. This new feature will work both retroactively and into the future. You can be rest assured that we’ll be trying to keep your models aligned properly going forward as our imagery is updated.

If your model was affected by this process you'll see a notification on your model details page. The notification will indicate whether we were able to automatically adjust the model or not.


In either case, we encourage you to review your models in the Google 3D Warehouse to see whether any action is required by you. We apologize for the inconvenience that this issue has caused and hope that this system improvement will be met with much user-happiness.

Permalink | Links to this post | 8 comments

A school for Mayan Teachers


3D models to help in visualization and communication have been one of SketchUp’s big strengths. Recently, I got in contact with Jim Fanjoy, an architect in the Peace Corps who has been using SketchUp for a school project in Guatemala. He has been using SketchUp models not only to help communicate with members of his team, but also to help bridge the language barrier between his design group and the local work force. Here's his story:

When I was originally contacted by the nonprofit for help designing the school, I did my first design proposals in SketchUp. It's fast, I used it before I joined the Peace Corps, and the renderings it produces are easily understandable by laypeople. Once we settled on a concept and started to develop it, I began showing plans and sections and elevations to the village elders and the local masons. It became clear early on that these types of drawings were causing a lot of confusion. In the US, we've spent centuries formalizing a system of presenting design data, and everyone in the construction industry has been trained to read plans, sections, and elevations. In the third world, though, most construction is done by semi-literate craftsmen with a good intuitive sense of what works, but no experience with drawings. And on a two-level, 8,000sf school, drawings were going to be necessary.

Spanish is a second language for all of us (the masons speak Q'anjob'al, a Mayan dialect), so I thought that the language barrier would be the biggest problem. Instead, I had to present the entire set of drawings in a non-traditional way that could be understood by the work crew. Using SketchUp, I modeled the building in much more detail than I normally would for design visualization. Using axonometric and three-point projections, carefully placed section cuts, and a lot of layers, I made drawings that show how the building would look during different phases of construction.

Complex systems, like the plumbing to catch and contain the rainwater for domestic use, are presented in perspective for easier visualization. Zoom-in details are presented only where they are critical, so the craftsmen will have the flexibility to use their traditional knowhow where it can save materials or labor. The various scenes from SketchUp were then brought into LayOut, so they could be labeled and printed out for the workmen.

Since SketchUp can be found in almost any design office, it also makes a good communication medium between consultants. I emailed my SketchUp model to an engineer in the US, to get his feedback on a few structural issues. My village is located on a remote mountainside in the highlands, and we have no phone lines or mail delivery. Via cellular internet and SketchUp, I had his response the next day.

SketchUp is also helping during construction. When there was some confusion on how to lay out the decorative "Mayan stairs" on the ends of the classrooms, I modeled them in more detail and dimensioned all the critical masonry measurements. I had the drawing to the masons the next day.

For more information on the project, you can visit the project's website and you can see reports of the construction progress on Jim Fanjoy’s Peace Corps blog. Jim, thank you for sharing all the information about your use of SketchUp on this project.

Permalink | Links to this post | 1 comments